(Ledebouria Socialis)
Silver Squill originates in the Eastern Cape Provence of South Africa. Though it’s related to the hyacinth, it appears like a succulent with its fleshy, bulb-shaped base where water is stored for surviving drought. This tough little plant spreads by producing offset bulbs, eventually forming a dense clump of individuals. When in bloom, airy wands display flowers half the size of a rice kernel, lovely to view through a magnifying lens. Though the plant’s unusual shape and leopard spotted leaves adds to its list of charms, it is the adaptable and forgiving nature of silver squill that anchors it as a solid houseplant for beginners and collectors alike.

Basic care instructions:
- Water weekly when soil is completely dry, less often Fall-Winter
- Bright indirect or diffused light
- Avoid temperatures below 50°C
- Repot and trim roots yearly (more often for pots 5″ and smaller)
- Note: Like many houseplants, silver squill is toxic. If you have a nibbler, keep the plant out of reach from toddlers and pets to be safe.
For the inexperienced plant caretaker or those unfamiliar with silver squill’s habits, feel free to read on. Seasoned plant enthusiasts might find useful ideas along the way, though no expert advice here—just personal experience, mostly leaning toward miniaturization.
Water
Once a week Spring-Summer. Once every 2-3 weeks Fall-Winter.
It can survive a surprisingly long time without water and not loose its foliage. Even if completely neglected and all the leaves fizzle away, the most shriveled looking bulb can bounce back after a single watering, producing new leaves within a couple weeks.
Let the soil dry completely between waterings. Over-watering is the surest way to harm your Squill. It is not necessary to wait for the bulb to shrivel—so long as the soil is dry after a week or two, give it a drink.

When the bulbs look wrinkly and shrunken, it’s definitely time to water. This particular plant has gone without water for over a month! Whoops! That’s ok, it can handle dry spells.
The same plant a month later is pictured below (having also been repotted) including two regularly scheduled waterings.

When fully hydrated, the bulbs are shiny and tight with stored water. They may shrug off their dull, papery jackets from time to time, revealing fresh, glossy skin. Whatever has shed can be tidied up by gently pulling it off, provided it comes away effortlessly like dry onion skins.
Sprinkle or Soak?
For potted plants, watering overhead is fine. However, if the soil is very dry, it may repel water more easily than absorb it, running though the pot with minimal effect. Like a flash flood in the desert, most of the water will zoom through the landscape and little will have actually soaked in. Soaking the soil from the bottom up assures that all of the soil and core of the root ball will have fully hydrated, while leaving any decorative gravel up top neatly undisturbed.
Soaking Method: This method is especially helpful for pots 5 inches and smaller (which dry out so quickly) or any sized potting that has been left to dry out very thoroughly. Submerge the pot in a bowl of water nearly to the top of the pot. The pot must have a drainage hole in the bottom for the water to enter and travel upward. Let it soak for 10 minutes (20 minutes if it’s very dry, 30-40 minutes if it’s a larger pot), then drain well. Avoid soggy bottoms and sitting in drip tray puddles all week, as it may lead to root rot.
Tippy or floaty? Does the plant pop out of its pot and float like a cork when given a soak? Or does the pot bob around and threaten to tip over? Let it sit in much shallower water first, saturating for a few minutes before raising the water level again, though it may still float a bit before fully hydrating. Water with patience—a meditation to cool your own roots.
Watering larger pots: Pots 6-8 inches or larger might not dry out as harshly as smaller pots, and so watering overhead as you would most houseplants will be fine, provided the pot has drainage holes. Just know that the soaking method is an option for hot or dry seasons when the plant needs an occasional deep watering, or if the soil has dried out extensively from normal periods of winter dormancy or just from plain old neglect.
Miniature Pots One Inch and Smaller
If you have a miniature pot with a drainage hole, set it in 1/4 – 1/2 inch of water and let it soak slowly from the bottom up. Any higher amount of water and you’ll be chasing around capsized pots–too fiddly and frustrating. Another option, because tiny pots dry out terribly fast, miniature pots that have no drainage holes can work beautifully. In this instance, the water stays put until absorbed evenly throughout even the driest little root ball. Should you overwater, these pots are so small that the soil will loose water through evaporation fast enough to keep the roots from drowning.
Note: Watering once a week in summer and every two weeks in winter still applies, though watch more carefully in summer. Unglazed clay pots will dry out much faster, requiring more frequent watering than glazed, glass or plastic. Choose accordingly for how much time and patience you have for plant maintenance.
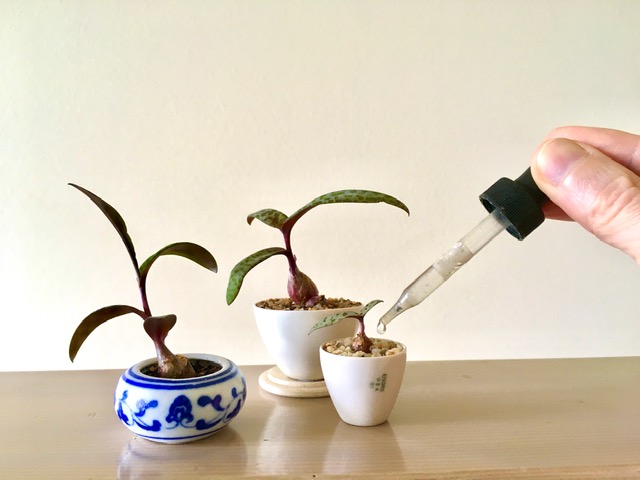
Watering miniature pots: A teaspoon of water (+/-) may be enough to hydrate the soil. Wait 5 minutes to see that it absorbs evenly before deciding to add more. Eyedroppers or laboratory wash bottles work especially well for small pots and miniatures, offering lots of control for delicate watering jobs.
What kind of Water?
Regular tap water is fine for squill planted in most any pot with drainage holes. But for miniature pots and especially those without drainage holes, rainwater, distilled or reverse osmosis water is the best. The smaller the pot size, the more quickly chemical and biological changes occur in the soil. Tap, spring or well water may too quickly leave a buildup of dissolved minerals, making the soil too alkaline (depending how hard your water is). Though your squill will likely survive, it may become ragged and weak looking. Maintaining a miniature plant unfailingly takes more care and consideration, but the results can be a delight.
Light
Indirect or diffused light
East facing windows are a good option; even direct light from the East is often not strong enough to scorch your plant. South and West facing windows are good from autumn through winter, but mind the summer months. Suddenly drooping, deflated leaves in direct sun may be a sign the light is too strong rather than a need for watering. You may need to pull the plant further away from the window or diffuse the light with a sheer curtain. Taping a sheet of tracing paper to the window could be a backup option. Be creative, innovate!

North facing windows might work, but you may get longer leaves and taller plants that reach and flop over, especially in northern latitudes. Generally, too little light will make your plant grow long, narrow or floppy. Do experiment, though. The sun’s strength in your geographic location may change the equation.
Overhead light will encourage the best shape for your plant, or just turn the plant once a week so that it doesn’t lean too far in one direction toward the window. LED grow lights can be a great solution for plants with too little winter light or other sub-optimal lighting situations. Aim for 8 hours a day of LED grow light exposure, the lights being 10-14 inches away from the plant (more or less depending on the strength of the lights). While there are loads of great LED plant lights on the market, this one has been the preferred brand at mini viridi: SANSI Full Spectrum LED Grow Light 24W Bulb (300 Watt Equivalent). Held at a 14-24 inch distance, this light works great for silver squill and a good many other light hungry cacti and succulents. Held 30-36 inches away, this light has also been fantastic for growing African Violets (FYI) which can also be a fussy about light levels. Not all plant grow lights have the same light spectrum or strength, be aware as you try out different options.
Feeding
Feed sparingly, once a month from mid-spring through summer (late April-August) using your preferred cactus/succulent fertilizer. Schultz® Cactus Plus 2-7-7 Liquid Plant Food is handy as it’s easy to prepare small amounts if you have very few plants to water. One drop mixed in 8 ounces of water would be adequate when all you need is a small batch.
Go for minimal fertilizing with miniaturized squill. Occasional soil changes automatically will provide some food too, but over-fertilizing may cause the plant to outgrow its pot faster than you prefer.
In truth, silver squill of any size will tolerate not being fertilized at all. It’s tough–it will tolerate being left in old, spent soil for years. It’ll tolerate all kinds of neglect and sporadic care, though it certainly won’t look very nice. It may go dormant under such conditions, drop its foliage and hibernate until the environment or caretaking improves. It is forgiving of almost everything but drowning, total darkness and cooking. You’ll be astounded by its response to occasional kindness—just watch!
Liquid fertilizers are nice in that they come with a dropper, making it easy to measure out small amounts. 1 drop/8oz. of water.
Use a Cactus/Succulent fertilizer (2-7-7) if you really plan to keep your plants on the side of small and slow-growing.
With general purpose liquid fertilizer (10-15-10…higher nitrogen, phosphorus, and potassium), the higher nitrogen levels might stimulate overgrowth, making the plant grow spindly and loose its compact shape. It may also encourage leaf and root rot. However, used very lightly, it may be passable.


With these organic liquid fertilizers, the lower nutrient level honestly means you could fertilize with either (2-2-2 for Organic Indoor! and 1-2-2 for Organic Cactus!) as they’re both low nitrogen. 1/4 teaspoon/8oz. of water would be your mixture ratio for these. Smelly, but effective.

Repotting
- 6 inch pots and larger: once a year
- 2-5 inch pots: two to three times a year
- 1 inch pots and smaller: three to four times a year
Silver Squill can grow roots surprisingly fast. Though it doesn’t mind being root bound for several months or beyond a year, it will eventually get weaker if the root ball grows too tight for too long and possibly go dormant. No worries! In two-to-three weeks after repotting, you’ll see the plant rejuvenate–sometimes dramatically.
For your pot, consider the material and how that affects maintenance as much as considering its appearance. Unglazed terra-cotta will dry out faster, while plastic or glazed pots dry out much slower–something to reconcile with how much time you have for watering. Bigger pots will be less maintenance than smaller.
As for soil, use anything that is well draining (contains around 15-20% perlite). A generally reliable brand to try is Black Gold®, and they do have a Natural & Organic Potting Mix if you prefer. The ingredients, soil particle size, aeration and drainage are good for most any houseplant. However, as product quality for any brand can change over time, even Black Gold seems lately to be a little overly chunky with debris while skimping on the perlite.
You may want to amend soils to your satisfaction (perlite is cheap and picking through hunks of bark and chunky twigs isn’t so bad considering the small sized pot you’re likely using). Just avoid overly fine, close textured soil that holds moisture too easily. If wet potting soil crumbles easily after you give it a medium strength squeeze, shaping it into a ball…this is good. If the ball of wet soil in your palm stays a little soggy or holds its shape too firmly, loosen it up with perlite or some grit (1/16th gravel, not fine sand).
Let’s begin repotting.
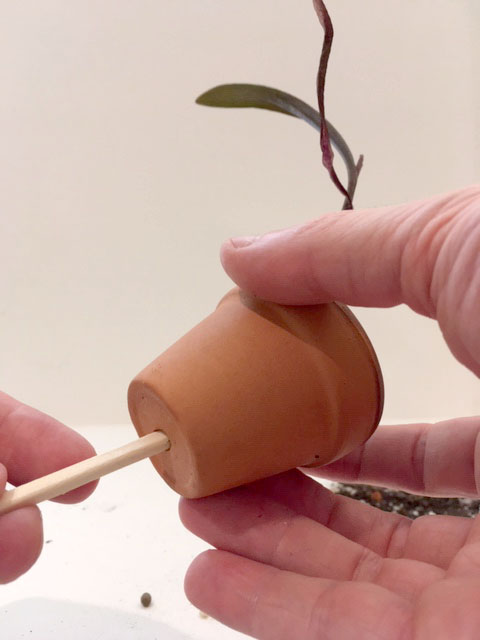
The blunt end of a pencil or chopstick is effective to gently push through a drainage hole and dislodge the root ball. Avoid pulling the plant out by its stem unless the roots feel very easy to free from the pot.

When the plant is at the end of a drying cycle, the root ball will be shrunken and easier to slide out of the pot. Dry soil crumbles away more easily.

After teasing the root ball open and gently detangling, crumbling away the old soil, trim off anything overly long (easy to see what needs trimming in this image).
Overall, the roots can be trimmed down to 2-3 inches, shorter if needed to fit a miniature pot. Don’t worry if it seems drastic as this stimulates new root growth.
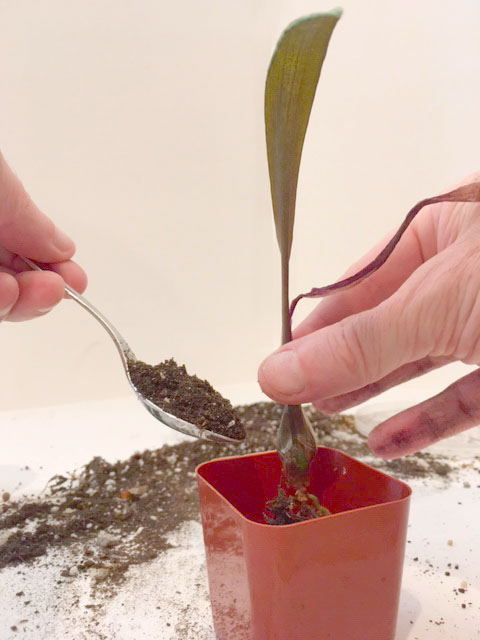
Positioning the base of the bulb just below the pot’s rim while spooning new soil around the roots, gently pressing the soil and adding more as needed…
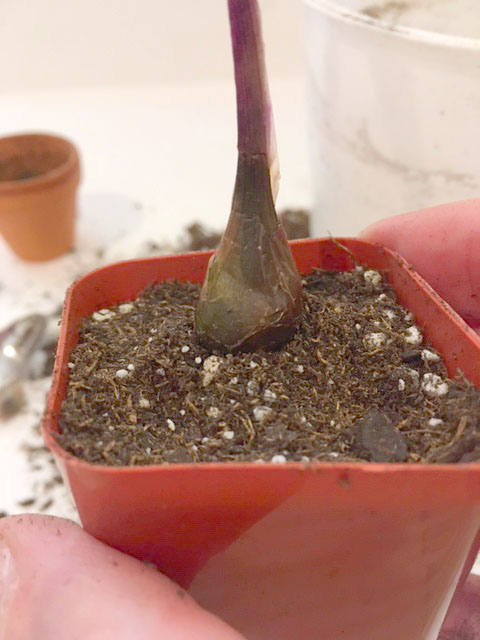
…until the bulb is firmed in, about 1/4 – 1/2 inch of its base below the soil line. Water thoroughly.
When watering the first time, you may need to add additional soil to firm around the base of the bulb to keep it standing. As an option, a 1/4 inch layer of decorative gravel will help stabilize the base (and deter fungus gnats). Gravel or pebbles 1/8 inch in size is ideal. Gravel any finer may inhibit the soil from breathing.
*Note on watering new soil. Frequently, new soil is a little on the dry side and doesn’t rehydrate easily, making your first watering after repotting a real hassle. Setting the pot in an inch or two of water and letting it soak until moisture is pulled all the way up to the top is one option for making sure you’re not left with dry pockets and a sad plant. Always drain well afterward.
A favorite option at mini viridi is to pre-moisten the soil before you spoon it in. If you think you’ll need two cups of soil, roughly measure out what you need into a bowl and then add half cup of water…stir it around or mash it up with your hand until the soil is evenly moistened and crumbly, not soggy…then proceed with repotting. You’ll find that the soil packs more readily around the roots (being firm yet gentle, PACK is maybe not the best word) and that the plant stays put once you finally water. First time watering with new, dry soil tends to displace the soil unevenly, shifting the plant around in the pot where you might not want it, while leaving hidden dry pockets. Dribble water in for your first watering for small pots, don’t fire-hose it with your faucet or watering can…half the soil will tsunami right out of the pot and down the drain.
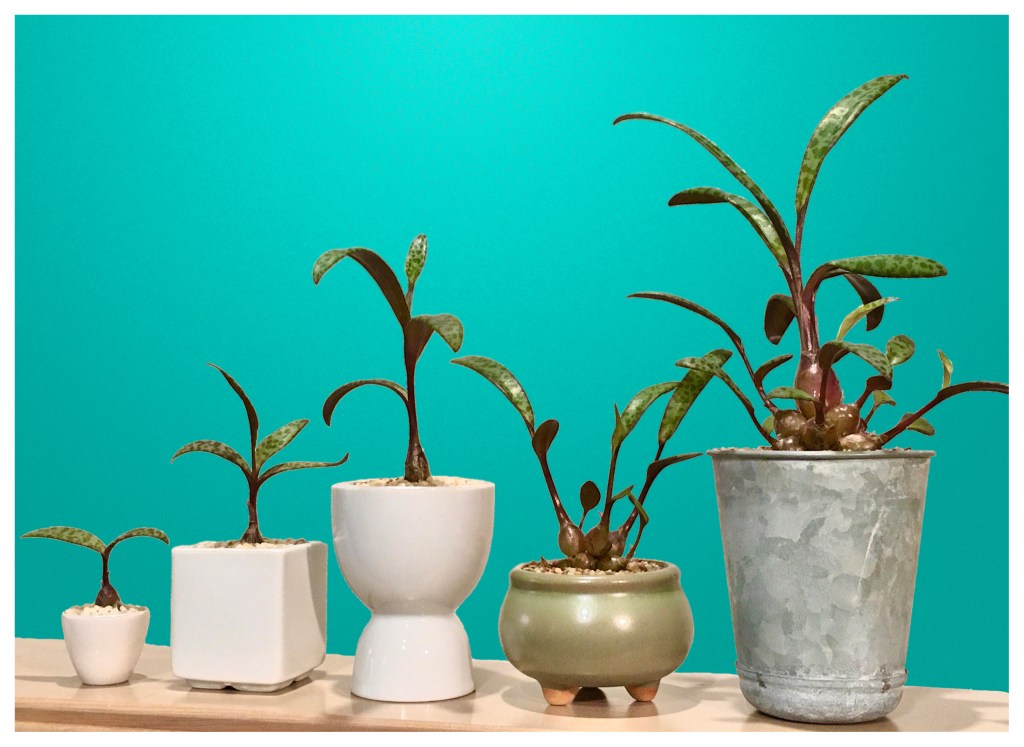
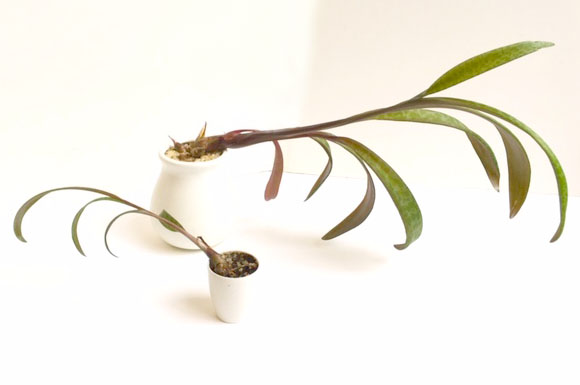
Super-Sized or Super Small
If you plant your squill in something 6-8 inches deep or more where there’s lots of room to root downward, watch it take off! You’ll be certain to get a bigger, beefier plant with thick stalks and a beer belly bulb. But what if you like the teensy weensy type with tiny teddy bear tummies?
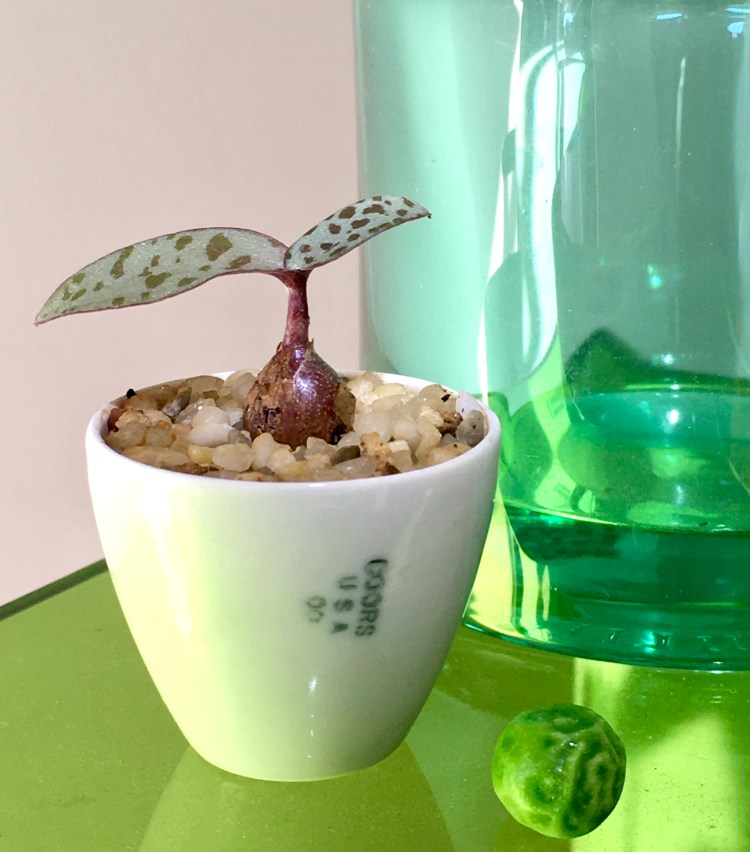
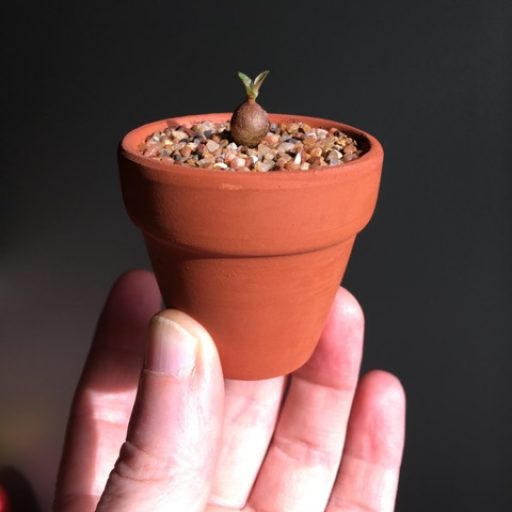
Wee ones. A frozen pea for scale sits by a one inch pot. This squill is over two years old and has adapted by growing very slowly. The smaller the pot, though, the more often you’ll need to renew the soil and trim the roots, similar to caring for bonsai. 3-4 soil changes a year and no fertilizing has kept this tiny tot cozy and cute.
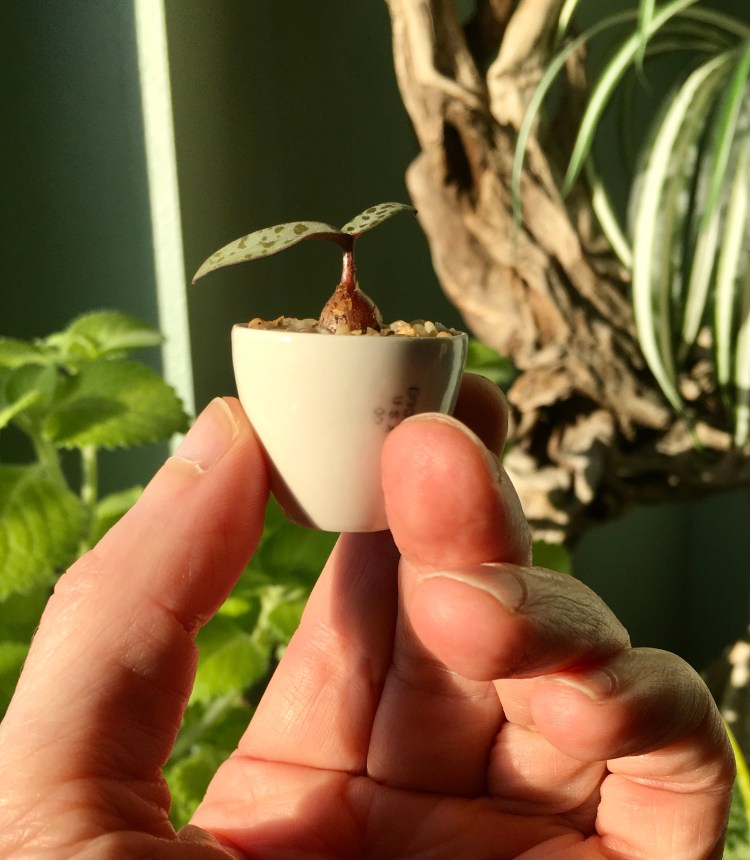
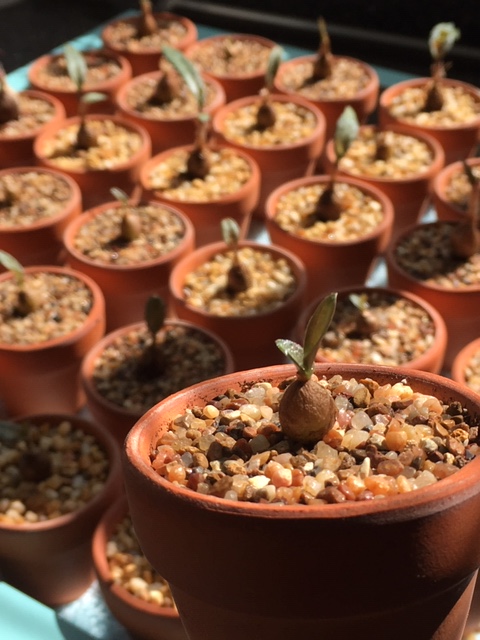
Miniatures are most easily started with a small offset bulb that hasn’t set foliage yet. Separated from the parent cluster and planted straight into a miniature pot, it usually sets roots in a few weeks if it hasn’t already begun. Water just enough to keep the soil from fully drying, barely moist. So long as the bulb looks plump, keep looking after it—leaves will appear in their own time. After a few months of leaf growth, trim the roots regularly (every three or four months) and repot in the same miniature pot or one that’s not much bigger than the original.
The Floppers
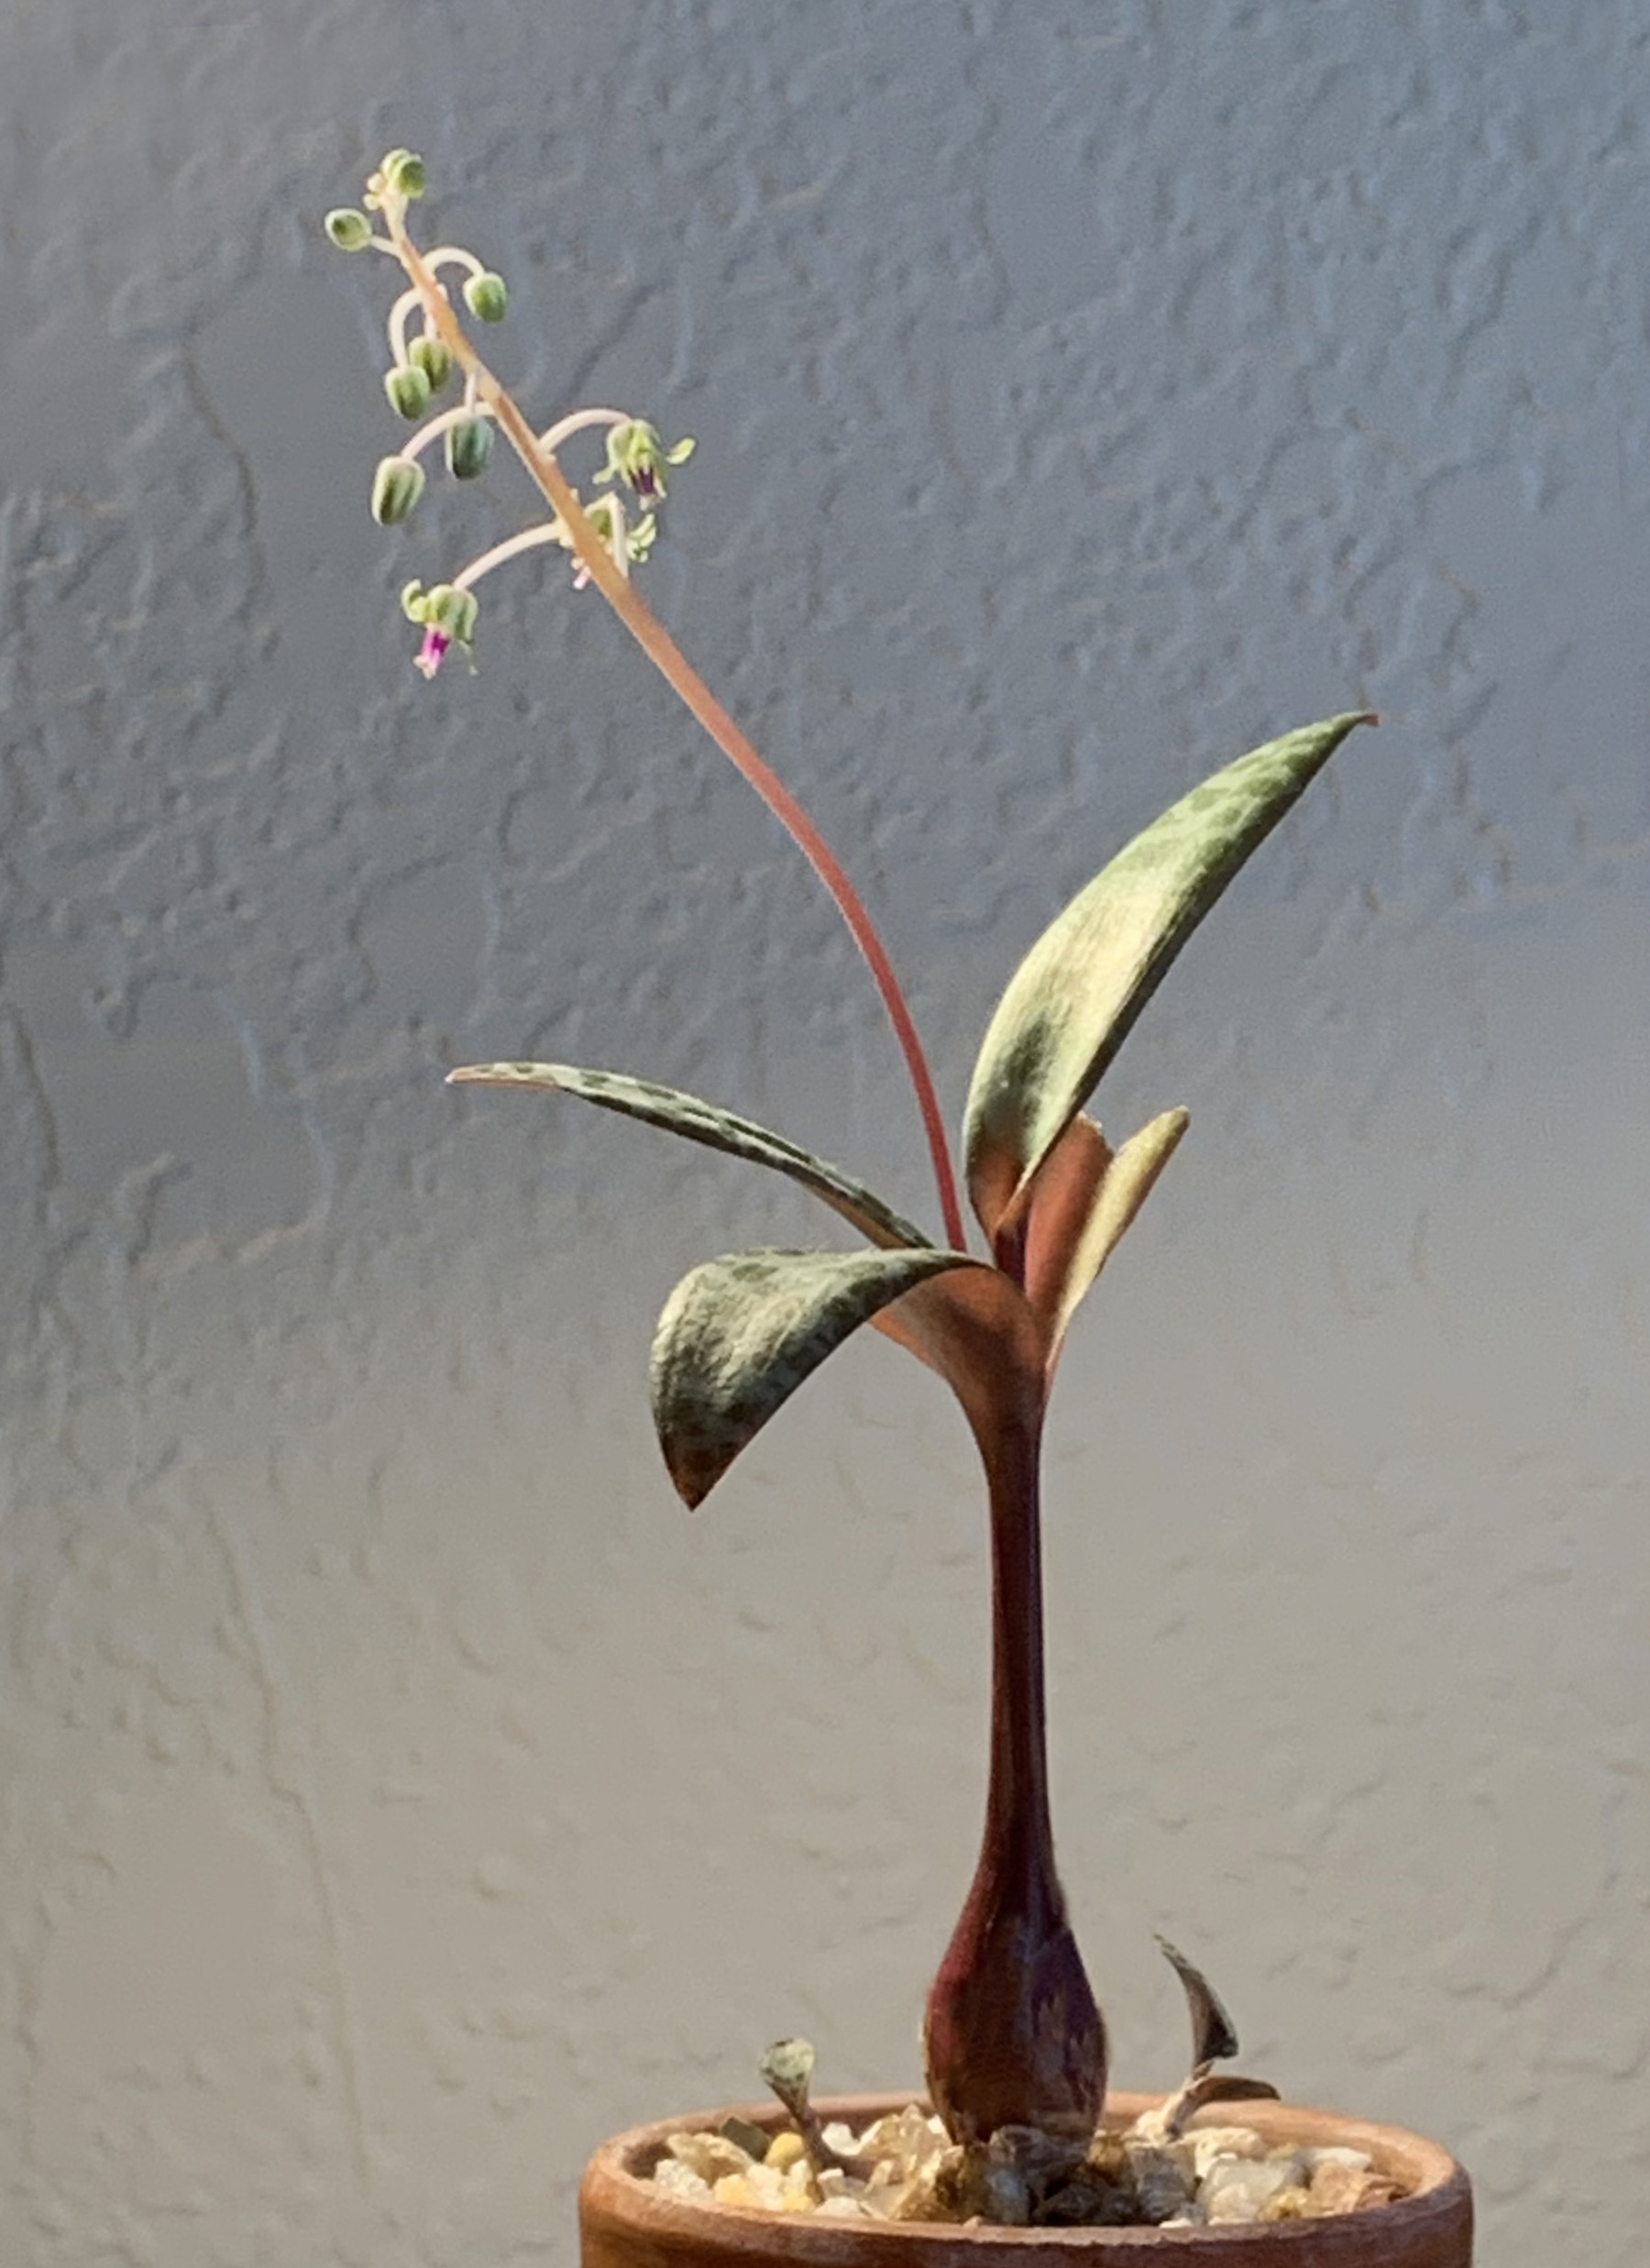
Plants that have grown tall and narrow due to low light conditions may flop over. With silver squill’s clumping habit, it’s also common for the taller parent bulb to get pushed off to the side at an angle by newly forming offset bulbs. In this case, flopping isn’t necessarily the result of low light conditions, but natural growth patterns.
Repot, Stake or Prune?
Repotting will stimulate the surrounding younger bulbs to grow larger and more numerous, eventually stabilizing the taller parent, though the flopper may not return to a fully vertical position. This is normal. Consider relocating the plant to a brighter location or using an LED grow light to help prevent stems growing overly long. Staking your flopper is another option, pruning it is a third.
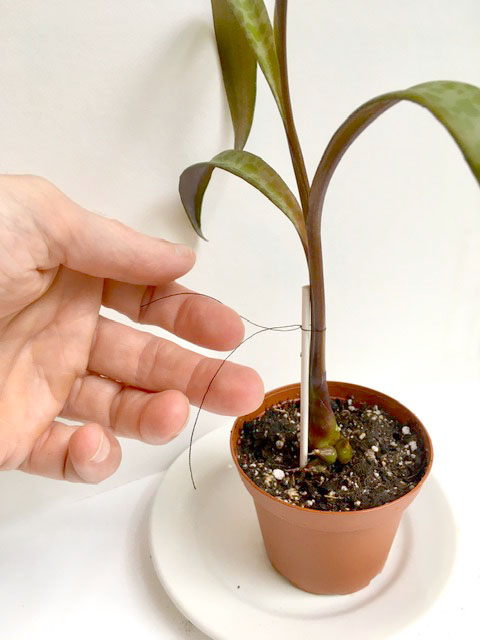
Option #2, stake your stem. Be careful not to tie it up too tight–keep it loose-ish. Once you water, the plant’s natural swelling could cut into the string.
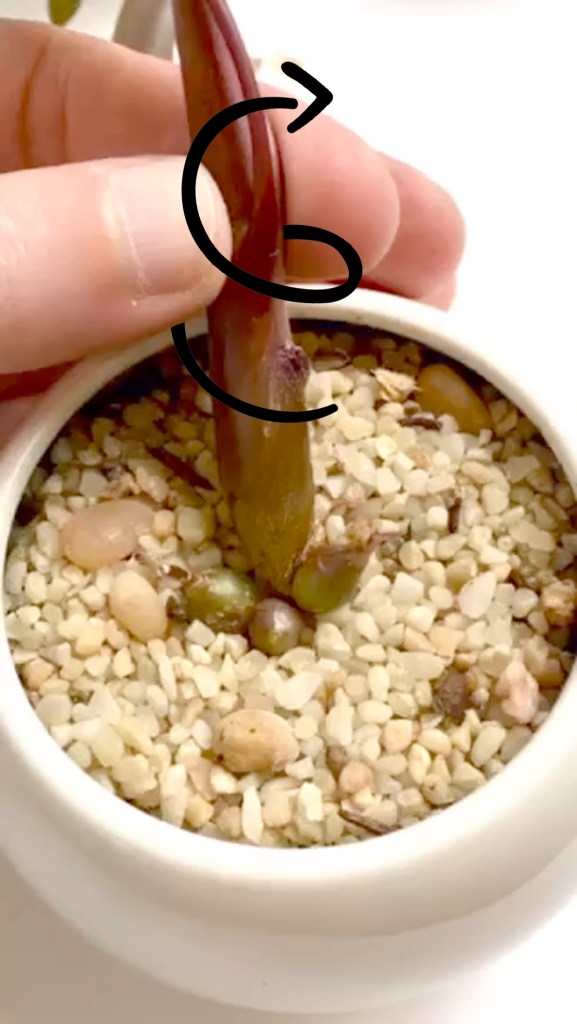
Option #3, pruning…twist off or trim away the flopper, creating a rosette of similar sized offsets.
Twisting off a bulb is easiest when the plant is at the end of a dry cycle—the bulbs will be shrunken and have room to maneuver. Roll the bulb between your thumb and index finger, one full turn usually does it. If it has developed side roots and cannot twist, try cutting.
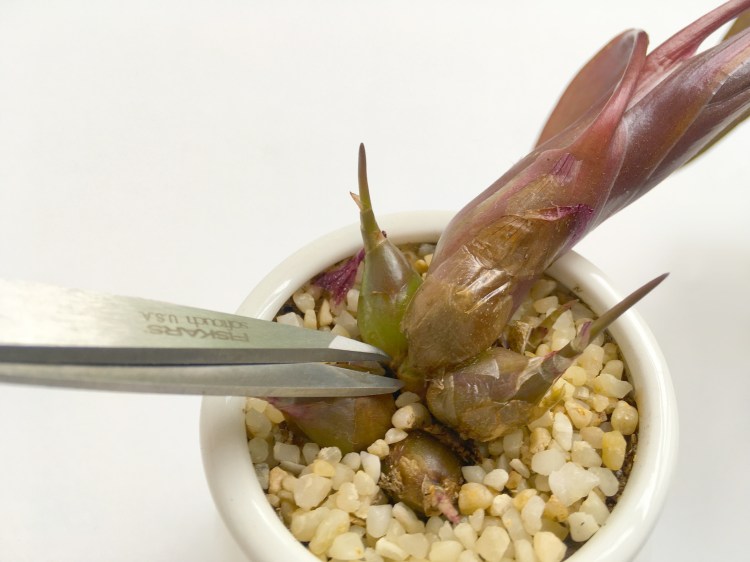
To trim, a narrow exacto knife or fine tipped scissors (like bonsai pruning shears or sewing scissors) will reach the base of the bulb easiest, right where the tap root begins.
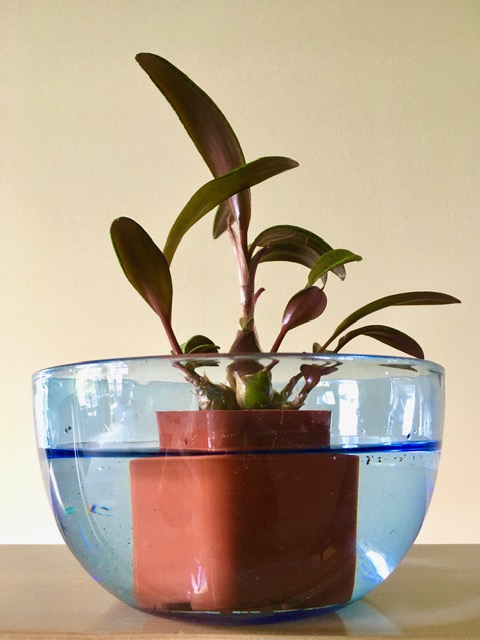
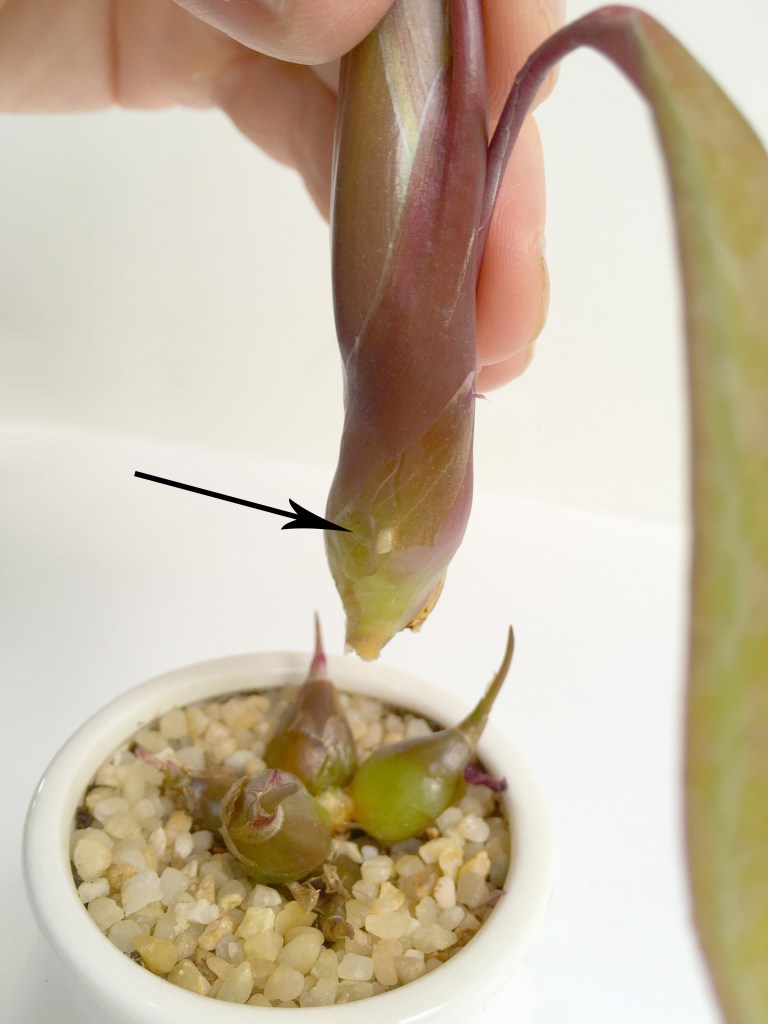
Once removed, it can be staked up in a separate pot to re-root, or thoughtfully composted if you already have more than enough greenery to look after. Notice the whitish dot on the center of this bulb—a root was already starting to form. This cutting will root fast, as most do. A few, occasionally, will take a much longer time. So long as the bulb looks plump, it’ll wake up when it’s ready and set down roots.
Thank you for visiting
Grow happily together
